I chose the ZWO 1600 Mono Cooled because of its relatively
wide field of view for the price. Likewise, having previously worked with the
ZWO ASI224MC planetary camera, I felt familiar with the product and software
(or so I thought.) With a new filter wheel and seven different filters, I was
ready to conquer the world of monochrome and narrow-band imaging.
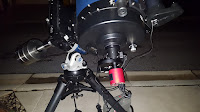 |
| ZWO 1600 Camera attached to my Meade LX-850 |
 |
| Zwo Motorized Filter Wheel |
Of course Maryland nights in March are notoriously
schizophrenic. This year was no exception. Every moonless night, clouds filled the sky. So, I again made plans to meet a friend in
Southern Georgia, packed my scope into the tiny Fiat 500 and braved the
treacherous lanes of I-95 South.
Although never-ending lane closures in South Carolina
delayed my arrival, The Stephen Foster State Park greeted me with crystal
skies. My exhaustion dissolved as I saw a beautiful cone of the Zodiacal Light
over The Okefenokee Swamp. I jumped out of my vehicle and immediately set my
scope up next to my friend’s newly-purchased Meade LX-850.
While the telescope's temperature equalized to the chilly night air, I set up a Canon 60D on a steady tripod, pointed it toward Orion and allowed it to take 30 second exposures until the battery expired. Although my makeshift dew shield interfered as the breezy swamp air flowed by, I like the results. I had never attempted video astrophotography. Clearly, we positioned ourselves on the busy air corridor between Florida and the Northeast.
Deep sky astrophotography still challenges me with the paltry
number of images obtained on a given night. Now that I would be imaging each
object in multiple wavelengths, I planned to observe only a few objects each evening. The first two nights of the trip, I planned to
observe only seven deep-sky objects. Between nebulae and galaxies, I would
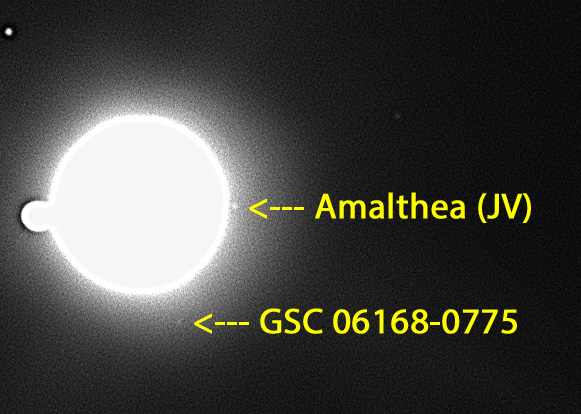
attempt to image a few of the Gas Giants’ irregular satellites
NIGHT 1
Object Total File Total Description
Time Type Images
Venus 10 mins. .AVI 4000 One
Video of Each Luminosity/Red/Green/Blue
Filters
Mercury 10 mins. .AVI 4000 One Video of Each Luminosity/Red/Green/Blue Filters
Flats 30 mins. .FIT
25 Five exposures of each- Luminosity/Red/Green/Blue/H-Alpha
Filters
Horsehead Nebula 150 mins. .FIT 30 Six
5-minute exposures of each - Luminosity/Red/Green/Blue/H-Alpha Filters
Contingency Dark 5 mins. .FIT 1 Single
5-minute dark while slewing
Cone Nebula 100 mins. .FIT 20 Five
5-minute exposures of each - Red/Green/Blue/H-Alpha Filters
Contingency Dark 5 mins. .FIT 1 Single
5-minute dark while slewing
JIV – Himalia 15 mins .FIT 3 Three 5-minute exposures of outer
Jovian satellite – Luminosity Filter
JIV – Elara 15 mins .FIT 3 Three 5-minute exposures of outer
Jovian satellite – Luminosity Filter
Ringtail Galaxy 100 mins. .FIT 20 Five
5-minute exposures of each – Luminosity/Red/Green/Blue Filters
Contingency Dark 5 mins. .FIT 1 Single
5-minute dark while slewing
S IX - Phoebe 15 mins .FIT 3 Three 5-minute exposures of outer
Saturnian satellite – Luminosity Filter
NIGHT 2
Object Total File Total Description
Time Type Images
Flats 30 mins. .FIT
25 Five exposures of each- Luminosity/Red/Green/Blue/H-Alpha
Filters
Orion Nebula 150 mins. .FIT 30 Six 5-minute exposures of each - Luminosity/Red/Green/Blue/H-Alpha
Filters
Contingency Dark 5 mins. .FIT 1 Single
5-minute dark while slewing
Rosette Nebula 60 mins. .FIT 20 Three 5-minute exposures of each -
Red/Green/Blue/H-Alpha Filters
Contingency Dark 5 mins. .FIT 1 Single
5-minute dark while slewing
M104 100 mins. .FIT 20 Five 5-minute exposures of each – Luminosity/Red/Green/Blue
Filters
JIV – Himalia 15 mins .FIT 3 Three 5-minute exposures of outer
Jovian satellite – Luminosity Filter
JIV – Elara 15 mins .FIT 3 Three 5-minute exposures of outer
Jovian satellite – Luminosity Filter
M87 100 mins. .FIT 20 Five 5-minute exposures of each – Luminosity/Red/Green/Blue
Filters
Contingency Dark 5 mins. .FIT 1 Single
5-minute dark while slewing
S IX - Phoebe 15 mins .FIT 3 Three 5-minute exposures of outer
Saturnian satellite – Luminosity Filter
Knowing that I would be working with these images for the
next few months, I needed a way to leave Georgia with more images on my hard
drive.
I had an idea.
The LX-850 must be balanced on three axes. Not only must the
operator balance the right ascension axis with the huge counterweights, the declination
axis must be perfectly balanced as well. Unfortunately, the scope is designed
to be intrinsically out of balance. The plate to which the heavy Optical Tube
Assembly has more metal on one side. A
counterweight is provided to offset that difference. However, the counterweight
over compensates. In order to achieve perfect balance, something must be placed
on the opposite side of the counterweight.
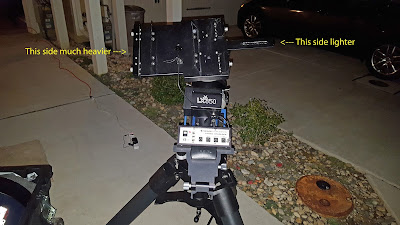 |
| LX-850 Mount. Left side of mounting plate is much larger than right side. |
I decided to attach my modified Canon Rebel XS DSLR camera and 90mm
Pro Optic scope to balance the counterweight. Programing the camera to take
five-minute exposures throughout the night, the Canon would serendipitously image
the objects the main scope pointed toward. I realized that many of the images
would be smeared as the scope slewed to other objects or I centered objects in
the main field of view. However, some exposures should capture wide-angle views
of the objects I imaged.
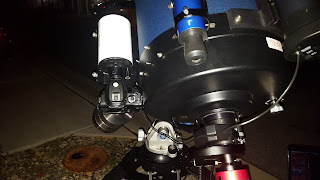 |
LX-850 with 90mm Pro Optic
Maksutov-Cassegrain and Modified Canon Rebel DSLR acting as Counterweight
|
Primary observing did not go well on either night. The New
ZWO 1600 seemed to randomly choose its own exposure times leaving many of my
images underexposed. Likewise, the camera seemed often to forget it was able to
cool itself marring my images with noise. When everything seemed to be going
well, I discovered the camera had forgotten that it had a filter wheel. The
exposures that seemed be taken in red, green and blue light actually were only
captured with one filter.
As Mercury was retrograde, I felt more like an astrologer
than an astronomer. I gathered my
tainted image set and returned to camp.
I did briefly glance at the images acquired with the Canon.
At first glance, they looked underexposed as well. Thus, they were quickly forgotten.
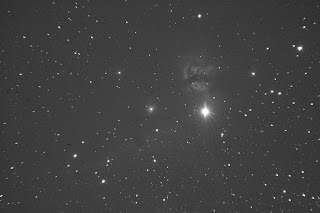 |
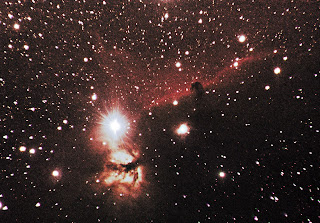
| Horsehead Nebula - Single Five-Minute Exposure - Pro Optic 90mm F/5.6 Lens - Canon Rebel XS (Modified) |
With a storm front quickly approaching, we cancelled the
rest of our trip. I bid my friend farewell, and returned to Maryland,
crestfallen.
Sometime later, while struggling with Pixinsight to wring some
usable images out of my data, I set my primary image set aside and looked at the
images from the Canon. I pulled a single image of The Horsehead up and
minimally processed it. I sat stunned as the Horsehead Nebula in all its
difficult-to-image glory appeared in my screen.
 |
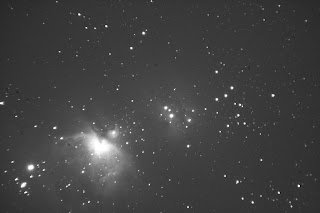
| Horsehead Nebula - Histogram Stretched with Photoshop. |
Yes, the image was imperfect. The less-than-perfect optics
of the 90mm Pro Optic bloat stars along the edge of view. Moreover, whoever
“modified” the camera, removing its infrared filter, damaged many pixels on the
sensor. These show up as dark spots on the image and can be removed with flat
fields.
Believing the images to be underexposed, I never bothered to
gather flats or darks. Therefore, I immediately attached the camera to the 90mm
Pro Optic and used a blank wall to get my flats.
Darks were going to be more difficult to acquire. They
should be taken at the same temperature and exposure as the original images.
How was I going to know the temperature of that humid swamp air weeks ago? Again, serendipity stepped in to save the
image. Remembering that the Zwo camera often turned its cooler off throughout
then night, I need only look at the metadata from those noisy uncooled images.
It was not difficult to get the sensor temperature from Zwo images taken nearly
at the same time as the Canon images.
The first night was cold. Most of the uncooled images were
taken at 5-7°C. I set the temperature of our refrigerator up to 6°C and placed
the camera inside allowing it to take 10 five-minute exposures. The second
night was warmer. Coincidentally, our garage’s temperature was the same 15°C as
the swamp are on the night I took the images. The camera went from the fridge
to the garage to get the second set of dark images.
With a little cropping and processing, I got the image of
The Horsehead.
Here is the same data processed to bring more detail out in the nebula.
The images of The Cone Nebula were not as impressive. The nebulosity
was barely visible at the edge of the field of view.
However, with a little
processing and a lot of cropping, I got a cute little image of The Christmas
Tree.
 |
| The "Christmas Tree" |
Images of The Rosette Nebula were not very impressive
either. However, you can see its thick ring on the bottom left of the image.
 |
| Rosette Nebula - Single Five-Minute Exposure |
|
|
With a little processing, The Rosette's famous ring structure becomes apparent.
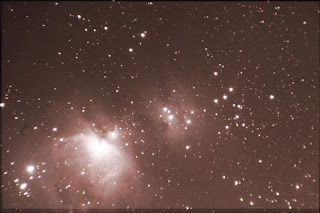
Lastly, The Great Nebula in Orion shone brilliantly, I could
see success on the unprocessed images.
 |
| Orion Nebula - Single Image - Unprocessed |
After stacking with Deep Sky Stacker.
 |
| Orion Nebula - Stack of 12 Five-Minute Exposures |
|
After Working in Photoshop with the color.
When I look at these images, I cannot believe they were
taken with an small telescope that I purchased to photograph the 1994 Annular Eclipse. The
camera’s primary use is infrared photography. The total cost of the setup (not including the
mount) was $300.00.
Why did imaging with the new camera fail? The short answer is I was using software developed for planetary imaging to expose deep sky images. Of course not all of the images through the main scope were unusable. Those images will appear in some future blog posting.
Obviously, one doesn’t need budget-breaking equipment to
obtain great astrophotographs. All that is required is good motor drive and a little serendipity.
Keep Looking Up to Clear Skies.
Ken